 webpack从入门到精通
webpack设置
新建一个初始化项目npm init -y 安装webpack,npm install --save-dev webpack 新建webpack配置文件webpack.config.js
const path = require('path')

module.exports = {
  // 入口文件
  entry:"./src/app.js",
  // 打包后的文件
  output:{
	//path 需要使用绝对路径,这里引入一个nodejs的path模块
    path:path.resolve(__dirname, 'dist'),
    filename:'main.js'
  }
}
2
3
4
5
6
7
8
9
10
11
12
修改package.json文件 在"script"中添加
{
	"dev": "webpack"
}
2
3
如果将webpack.config.js修改名字为webpack.config.dev.js,则需要设置为
{
	"dev": "webpack --config webpack.config.dev.js"
}
2
3
lesson3 插件 插件plugin 安装一个创建html文件的html-webpack-plugin插件 npm install --save-dev html-webpack-plugin
const path = require('path')
const HtmlWebpackPlugin = require('html-webpack-plugin')
module.exports = {
  // 入口文件
  entry:"./src/app.js",
  // 打包后的文件
  output:{
  //path 需要使用绝对路径,这里引入一个nodejs的path模块
    path:path.resolve(__dirname, 'dist'),
    filename:'main.js'
  },
  plugins:[
    new HtmlWebpackPlugin({
      filename:"setName.html", //可以设置输出文件的名字
      template:"src/index.html"  //可以设置打包文件的模板
    })
  ]
}
2
3
4
5
6
7
8
9
10
11
12
13
14
15
16
17
18
lesson4 loader 由于在js文件中写入html代码,不能够被正常编译使用,或者一些es6语法,不能被浏览器识别,需要一个loader进行预编译 在webpack.config.js中添加设置loader
项目中先安装依赖 npm i -D babel-loader babel-core babel-preset-react
在app.js中添加jsx语法
import React from 'react'
import ReactDOM from 'react-dom'

ReactDOM.render(
    <div>引入了react框架</div>,
    document.getElementById('root')
)
2
3
4
5
6
7
const path = require('path')
const HtmlWebpackPlugin = require('html-webpack-plugin')
module.exports = {
  // 入口文件
  entry:"./src/app.js",
  // 打包后的文件
  output:{
  //path 需要使用绝对路径,这里引入一个nodejs的path模块
    path:path.resolve(__dirname, 'dist'),
    filename:'main.js'
  },
  module:{
    rules:[
      { test: /\.js$/,  // 判断文件的类型
        use: [
          loader:'babel-loader',
          options:{       // 配置编译的参数
            presets:['react']
          }
        ]
      }
    ]
  },
  plugins:[
    new HtmlWebpackPlugin({
      filename:"setName.html", //可以设置输出文件的名字
      template:"src/index.html"  //可以设置打包文件的模板
    })
  ]
}
2
3
4
5
6
7
8
9
10
11
12
13
14
15
16
17
18
19
20
21
22
23
24
25
26
27
28
29
30
lesson5 webpack-dev-server
npm install --save-dev webpack-dev-server 安装好文件依赖包,就可以在module.exports中引用
module.exports = {
  // 入口文件
  entry:"./src/app.js",
  // 打包后的文件
  output:{
  //path 需要使用绝对路径,这里引入一个nodejs的path模块
    path:path.resolve(__dirname, 'dist'),
    filename:'main.js'
  },
  module:{
    rules:[
      { test: /\.js$/,  // 判断文件的类型
        use: [
          loader:'babel-loader',
          options:{       // 配置编译的参数
            presets:['react']
          }
        ]
      }
    ]
  },
  plugins:[
    new HtmlWebpackPlugin({
      filename:"index.html", //可以设置输出文件的名字
      template:"src/index.html"  //可以设置打包文件的模板
    })
  ],
  devServer:{
    open:true,
    port:8888
  }
}
2
3
4
5
6
7
8
9
10
11
12
13
14
15
16
17
18
19
20
21
22
23
24
25
26
27
28
29
30
31
32
lesson6 引入css文件时需要使用css-loader、style-loader npm i -D css-loader style-loader
module.exports = {
  // 入口文件
  entry:"./src/app.js",
  // 打包后的文件
  output:{
  //path 需要使用绝对路径,这里引入一个nodejs的path模块
    path:path.resolve(__dirname, 'dist'),
    filename:'main.js'
  },
  module:{
    rules:[
      {
        test: /\.js$/,  // 判断文件的类型
        use: [
          loader:'babel-loader',
          options:{       // 配置编译的参数
            presets:['react']
          }
        ]
      },
      {
        test: /\.css$/,  // 判断文件的类型
        use: ['style-loader', 'css-loader']
      },
    ]
  },
  plugins:[
    new HtmlWebpackPlugin({
      filename:"index.html", //可以设置输出文件的名字
      template:"src/index.html"  //可以设置打包文件的模板
    })
  ],
  devServer:{
    open:true,
    port:8888
  }
}
2
3
4
5
6
7
8
9
10
11
12
13
14
15
16
17
18
19
20
21
22
23
24
25
26
27
28
29
30
31
32
33
34
35
36
37
lesson7 引入图片文件时需要使用file-loader npm i -D file-loader
module.exports = {
  // 入口文件
  entry:"./src/app.js",
  // 打包后的文件
  output:{
  //path 需要使用绝对路径,这里引入一个nodejs的path模块
    path:path.resolve(__dirname, 'dist'),
    filename:'main.js'
  },
  module:{
    rules:[
      {
        test: /\.js$/,  // 判断文件的类型
        use: [
          loader:'babel-loader',
          options:{       // 配置编译的参数
            presets:['react']
          }
        ]
      },
      {
        test: /\.css$/,  // 判断文件的类型
        use: ['style-loader', 'css-loader']
      },
      {
        test: /\.(jpg|gif|png|jpeg)$/,  // 处理图片文件
        use: ['file-loader']
      },
    ]
  },
  plugins:[
    new HtmlWebpackPlugin({
      filename:"index.html", //可以设置输出文件的名字
      template:"src/index.html"  //可以设置打包文件的模板
    })
  ],
  devServer:{
    open:true,
    port:8888
  }
}
2
3
4
5
6
7
8
9
10
11
12
13
14
15
16
17
18
19
20
21
22
23
24
25
26
27
28
29
30
31
32
33
34
35
36
37
38
39
40
41
lesson9 引入图片文件时需要使用url-loader,url-loader可以将图片转成base64 npm i -D url-loader
module.exports = {
  // 入口文件
  entry:"./src/app.js",
  // 打包后的文件
  output:{
  //path 需要使用绝对路径,这里引入一个nodejs的path模块
    path:path.resolve(__dirname, 'dist'),
    filename:'main.js'
  },
  module:{
    rules:[
      {
        test: /\.js$/,  // 判断文件的类型
        use: [
          loader:'babel-loader',
          options:{       // 配置编译的参数
            presets:['react']
          }
        ]
      },
      {
        test: /\.css$/,  // 判断文件的类型
        use: ['style-loader', 'css-loader']
      },
      {
        test: /\.(jpg|gif|png|jpeg)$/,  // 处理图片文件
        use: [{
          loader:'url-loader',
          options:{  // 图片文件小于这个时,会进行转换
            limit:10000
          }
          }]
      },
    ]
  },
  plugins:[
    new HtmlWebpackPlugin({
      filename:"index.html", //可以设置输出文件的名字
      template:"src/index.html"  //可以设置打包文件的模板
    })
  ],
  devServer:{
    open:true,
    port:8888
  }
}
2
3
4
5
6
7
8
9
10
11
12
13
14
15
16
17
18
19
20
21
22
23
24
25
26
27
28
29
30
31
32
33
34
35
36
37
38
39
40
41
42
43
44
45
46
lesson10 引入字体 在css文件中引入字体文件时,需要安装file-loader, css-loader的作用是:处理css文件中出现的url,会自动引入处理相应文件所需的loader file-loader的作用是:把资源移动到输出目录,并返回最终引入资源的url
{
  test: /\.(ttf|eot|woff|woff2|svg)$/,
  use: [ 'file-loader' ]
}
2
3
4
lesson12 css模块化 main.css
  .line{
    background: #f65;
  }
  .inner{
    font-weight: bold;
    color:#000;
  }
2
3
4
5
6
7
small.css
  .line{
    font-size: 30px;
  }
2
3
在js文件中可以全局引入css,如 import '../css/main.css'; 模块化引入css, import style from '../css/main.css' import small from '../css/small.css' 更改webpack.config.js配置文件
// 处理成模块化css
  {
    test:/\.css$/,
    use:['style-loader',
    // css模块化
    {
      loader:'css-loader',
      options:{
        module:true,
        // 编译出来类的名称
        localIdentName: '[path]_[name]_[local]_[hash:6]'
      }
    }],
    exclude:[
      path.resolve(__dirname, 'node_modules'),
      path.resolve(__dirname, 'src/asset/style'),
    ]
  },
  // 处理成全局的css
  // 无options参数配置,直接写字符串
  {
    test:/\.css$/,
    use:['style-loader','css-loader'],
    include:[
      path.resolve(__dirname, 'node_modules'),
      path.resolve(__dirname, 'src/asset/style'),
    ]
  }
2
3
4
5
6
7
8
9
10
11
12
13
14
15
16
17
18
19
20
21
22
23
24
25
26
27
28
这样通过两个对象就可以模块化引入css 然后就可以在dom结构中引入
  // 模块化引入,通过webpack.config.js配置排除了全局化设置
  import style from './asset/style/main.css'
  // 模块化引入,通过webpack.config.js配置排除了全局化设置
  import small from './asset/style/small.css'

  //webpack.config.js配置,只有外部路径的css被模块化,
  import outer from './outer.css'

  ReactDOM.render(
      <div className={style.line}>
          <span className={small.line}> 引入了react框架he</span>
       </div>,
      document.getElementById('root')
  )
2
3
4
5
6
7
8
9
10
11
12
13
14
lesson15 关于预处理样式scss(sass)、less文件的编译 处理scss(sass)文件先安装依赖包,都是引入sass-loader和node-loader npm install --save-dev sass-loader node-sass 在webpack.config.js中添加配置
{
  test:/\.scss$/,
  use:['style-loader', 'css-loader', 'sass-loader']
}
2
3
4
如果是less文件 需要安装npm install --save-dev less less-loader 在webpack.config.js中添加配置
{
  test:/\.less$/,
  use:['style-loader', 'css-loader', 'less-loader']
}
2
3
4
lesson18 重新认识babel-loader 处理js文件的时候,要使用babel编译一些es6语法或者react语法, 可以在webpack.config.js中设置需要引用的插件plugins或presets
{
  test:/\.js$/,
  use:[{
    loader:'babel-loader',
    // options配置选项可以单独写出一个.babelrc文件,可以分离出来
    options: {
      // 预设,包含多个插件
      presets:['react','env'],
      // 插件,处理一些最新的语法
      plugins: ["transform-object-rest-spread"]
    }
  }],
  // 排除掉一些不需要babel处理的文件
  exclude:[
    path.resolve(__dirname, 'node_modules')
  ]
}
2
3
4
5
6
7
8
9
10
11
12
13
14
15
16
17
关于options还可以单独写成.babelrc文件 文件内容是一个json对象 .babelrc
  {
    "presets":["react","env"],
    "plugins": ["transform-object-rest-spread"]
  }
2
3
4
lesson20 output的publicPath和devServer的publicPath
output:{
    path:path.resolve(__dirname, 'dist/'),
    filename:'assets/js/app.js',
    //output中的public是所有打包文件的根路径,并且必须以/结束。
    publicPath:'/public/'
},
2
3
4
5
6
设置过output的publicPath,要访问打包出来的index.html,则要加上publicPath的路径 如:localhost:8080/public/index.html
  devServer:{
    open:true,
    port:8888,
    contentBase:'/src',
    //服务器打包资源后的输出路径,不需要用 / 作为结尾
    publicPath:"/pub"
  }
2
3
4
5
6
7
设置过devServer的publicPath,要访问打包出来的index.html,则要加上publicPath的路径 如:localhost:8080/pub/index.html
# webpack的介绍
# 为什么要使用webpack
现如今的前端开发项目庞大,文件系统复杂,使用传统的开发模式很难进行管理,为了简化开发的复杂度,前端社区涌现出了很多好的实践方法,他们可以控制复杂的JavaScript代码和一大堆依赖包。
- 模块化 让我们可以吧复杂的程序细化为小的文件
- 类似于TypeScript这种在JavaScript基础上拓展的开发语言:使我们能够使用目前浏览器不支持的语言,进行开发,然后转换为浏览器可以识别的JavaScript文件。
- Sass,less等CSS预处理器
- 打包压缩文件大小 这些改进提高了前端的开发效率,
# 什么是webpack
webpack是模块打包机:它可以分析项目结构,找到JavaScript模块以及其他的一些在浏览器下不能直接运行的拓展语言(Scss,TypeScript等),并将其转换和打包为合适的格式供浏览器使用。
# WebPack和Grunt以及Gulp相比有什么特性
Gulp/Grunt是一种能够优化前端的开发流程的工具,而WebPack是一种模块化的解决方案
Grunt和Gulp的工作方式是:在一个配置文件中,指明对某些文件进行类似编译,组合,压缩等任务的具体步骤,工具之后可以自动替你完成这些任务。
 Grunt和Gulp的工作流程
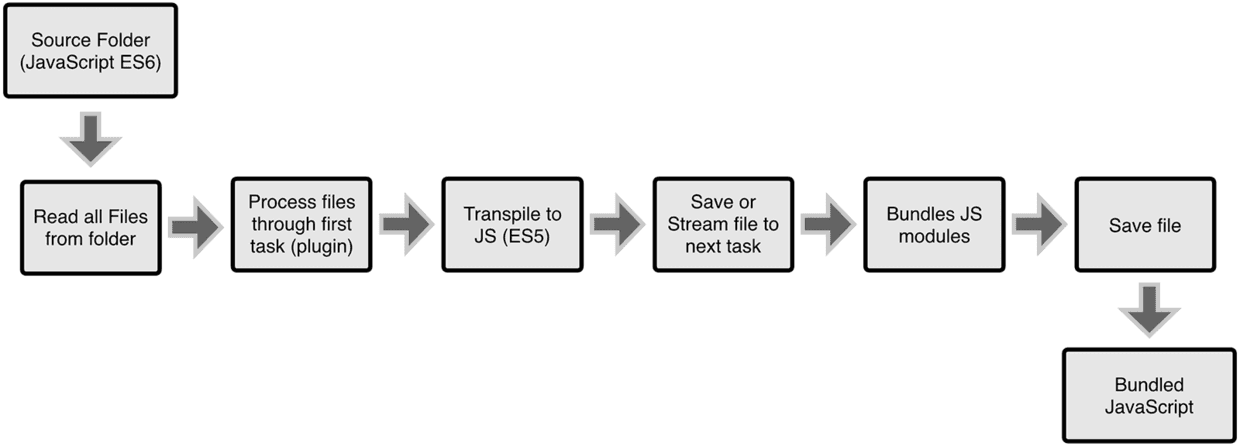
webpack的流程是,设置一个主入口文件,webpack将从这个文件开始找到项目中所有的依赖文件,使用loaders处理,最后打包为一个(多个)浏览器可识别的JavaScript文件
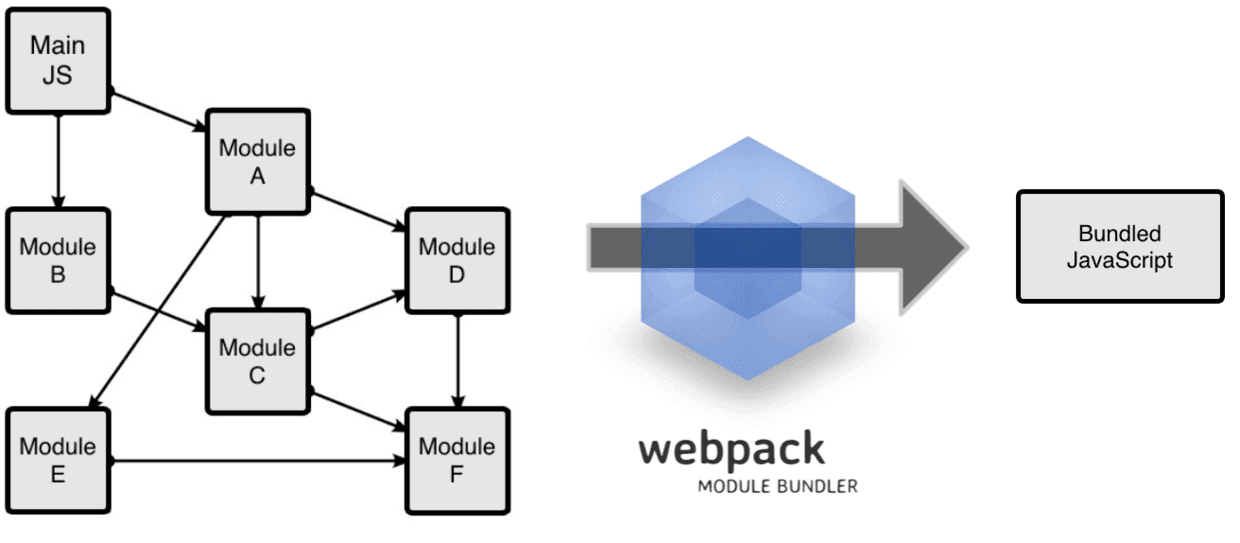 webpack的工作方式
# webpack使用概述
- entry,入口文件
- output,出口文件
- loaders,模块处理器
- Plugins,插件
# entry入口文件介绍
entry文件表示项目模块开始打包的主要依赖入口,进入到entry文件之后,webpack将查看项目其他的依赖模块或库。 在webpack configuration中通过配置entry属性,可以设置一个入口文件(或者多个入口文件)。 做一个简单的单入口entry文件示例
	module.exports = {
		entry:'./path/to/my/entry/file.js'
	};
2
3
多入口entry文件示例
	module.exports = {
		entry: {
		    pageOne: './src/pageOne/index.js',
		    pageTwo: './src/pageTwo/index.js',
		    pageThree: './src/pageThree/index.js'
		}
	}
2
3
4
5
6
7
对于处理多入口文件也可以采用动态匹配文件的方法
	module.exports = {
		entry : getEntry('./src/module/**/*.js');
	}

	function getEntry(globPath) {
	  var entries = {},
	      basename,
	      tmp,
	      pathname;

	  glob.sync(globPath).forEach(function (entry) {
	    basename = path.basename(entry, path.extname(entry));
	    tmp = entry.split('/').splice(-3); // ["module", "*", "**.js"]
	    pathname = tmp.splice(0, 1) + '/' + basename; // 正确输出html的路径
	    entries[pathname] = entry;
	  });

	  console.log("base-entrys:");
	  console.log(entries);
	  return entries;
	}
2
3
4
5
6
7
8
9
10
11
12
13
14
15
16
17
18
19
20
21
# output输出文件介绍
output输出文件的属性设置了webpack打包文件的路径和文件名; 可以根据自己的需要进行设置,不同的文件名和路径。
	const path = require('path'); // nodejs语法引入js

	module.exports = {
	  entry: './path/to/my/entry/file.js',
	  output: {
	    path: path.resolve(__dirname, 'dist'),
	    filename: 'my-first-webpack.bundle.js'
	  }
	};
2
3
4
5
6
7
8
9
在上面这个例子中,我们使用output.filename和output.path属性去设置webpack打包后的文件名和要存放文件的路径。
# Loaders介绍,在module.rules下的一个属性
loaders可以使webpack处理不仅仅限于JavaScript的文件,它赋予了webpack处理各种文件的能力,通过使用合适的loaders来编译他们。 更进一步说,在webpack config中的loaders有两个目标任务
- 确定哪种类型的文件需要被一个指定的loaders编译(使用test属性)。
- 使用所依赖的包文件来编译这些文件(使用use属性)
webpack.config.js
const path = require('path');

module.exports = {
  entry: './path/to/my/entry/file.js',
  output: {
    path: path.resolve(__dirname, 'dist'),
    filename: 'my-first-webpack.bundle.js'
  },
  module: {
    rules: [
      { test: /\.txt$/, use: 'raw-loader' }
    ]
  }
};
2
3
4
5
6
7
8
9
10
11
12
13
14
15
上面的配置文件定义了一个rules属性,里面定义了test和use两个必须属性来处理一个模块,它告诉webpack按照下面规则编译:
"Hey webpack compiler, when you come across a path that resolves to a '.txt' file inside of a require()/import statement, use the raw-loader to transform it before you add it to the bundle."
告诉webpack将txt文件添加到bundle文件之前,先用raw-loader进行处理。 更多loaders知识,学习其他的loaders (opens new window)
# Plugins介绍
当使用loaders编译指定模块类型时,插件可以执行其他更多的任务。插件的范围从极致优化和缩小文件的多种形式定义环境变量。插件功能非常强大,可以用来处理各种各样的任务。 为了使用插件,需要使用require()引入,并将其加入到plugins数组,大多数插件都是通过options可定制化处理任务。由于为了不同的目的你可以多次使用一个插件配置,你需要创建一个新的实例。
加上plugins之后的webpack.config.js
	const HtmlWebpackPlugin = require('html-webpack-plugin'); //installed via npm
	const webpack = require('webpack'); //to access built-in plugins
	const path = require('path');

	module.exports = {
	  entry: './path/to/my/entry/file.js',
	  output: {
	    path: path.resolve(__dirname, 'dist'),
	    filename: 'my-first-webpack.bundle.js'
	  },
	  module: {
	    rules: [
	      { test: /\.txt$/, use: 'raw-loader' }
	    ]
	  },
	  plugins: [
	  	// js解释器、最小化器、压缩器、美化器工具集
	    new webpack.optimize.UglifyJsPlugin(),
	    // 新创建一个html文件,并且可以关联好打包过的js文件。
	    new HtmlWebpackPlugin({template: './src/index.html'})
	  ]
	};
2
3
4
5
6
7
8
9
10
11
12
13
14
15
16
17
18
19
20
21
22
23
webpack插件列表: lists (opens new window) 关于插件的更多 (opens new window)介绍和使用
安装webpack并进行一个初步的打包
# webpack的安装
在安装之前先初始化一个npm项目的环境,执行命令
$ npm init -y
会在文件夹中新建一个package.json文件,里面可以添加项目名称,项目描述,作者,程序启动命令等等。
// 全局安装
$ npm install -g webpack
// 安装到项目的开发环境
$ npm install --save-dev webpack
2
3
4
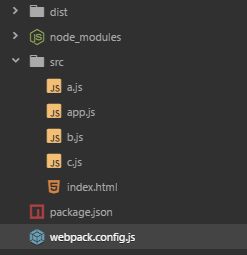
创建文件夹src,在里面新建文件a.js, b.js, c.js, app.js 四个文件 a.js
export default function a(){
	console.log("module a")
}
2
3
b.js
export default function b(){
	console.log("module b")
}
2
3
c.js
export default function c(){
	console.log("module c")
}
2
3
app.js //主入口文件
	import a from './a.js'
	import b from './b.js'
	import c from './c.js'
	a();
	b();
	c();
2
3
4
5
6
在项目文件夹中新建webpack.config.js配置文件
// nodejs语法
const path = require('path')

module.exports = {
  //入口文件
  entry:"./src/app.js",
  //打包输出的路径,文件和文件名
  output:{
    path:path.resolve(__dirname, 'dist'),
    filename:'main.js' // filename:'[name]_[hash:6].js'
  }
}
2
3
4
5
6
7
8
9
10
11
12
项目结构目录
如果创建的是webpack.dev.config.js文件,则在package.json的启动项中设置
{
	"dev": "webpack --config webpack.dev.config.js"
}
2
3
More info: Webpack (opens new window)
# webpack插件 html-webpack-plugin 的使用
此插件可以创建一个html文件,并且自动关联打包后的js 安装一个创建html文件的html-webpack-plugin插件 npm install --save-dev html-webpack-plugin
const path = require('path')
const HtmlWebpackPlugin = require('html-webpack-plugin')
module.exports = {
  // 入口文件
  entry:"./src/app.js",
  // 打包后的文件
  output:{
  //path 需要使用绝对路径,这里引入一个nodejs的path模块
    path:path.resolve(__dirname, 'dist'),
    filename:'main.js'
  },
  plugins:[
    new HtmlWebpackPlugin({
      filename:"setName.html", //可以设置输出文件的名字
      template:"src/index.html"  //可以设置打包文件的模板
    })
  ]
}
2
3
4
5
6
7
8
9
10
11
12
13
14
15
16
17
18
# webpack插件 UglifyjsWebpackPlugin 的使用
插件可以压缩js文件 安装 npm i -D uglifyjs-webpack-plugin
	const UglifyJsPlugin = require('uglifyjs-webpack-plugin')
	module.exports = {
	  plugins: [
	    new UglifyJsPlugin({
			test: /\.js($|\?)/i, //以js结尾的文件
			include: /\/includes/,  //包含的文件
			exclude: /\/excludes/  //排除的文件
	    })
	  ]
	}
2
3
4
5
6
7
8
9
10
更多插件的介绍plugin (opens new window)
# 使用webpack开发一个npm包,并发布到npmjs
# 创建webpack开发环境,设置package.json
执行npm init -y生成package.json
	{
	  "name": "num-word-chinese",
	  "version": "1.0.0",
	  "description": "将数字转成英文单词或者中文大写",
	  "main": "dist/num-word-chinese.js",
	  "module": "src/index.js",
	  "scripts": {
	    "test": "echo \"Error: no test specified\" && exit 1"
	  },
	  "author": "",
	  "license": "ISC",
	  "devDependencies": {
	    "webpack": "^4.31.0",
	    "webpack-cli": "^3.3.2"
	  },
	  "dependencies": {
	    "lodash": "^4.17.11"
	  }
	}
2
3
4
5
6
7
8
9
10
11
12
13
14
15
16
17
18
19
- main指定访问生成的js插件的入口
- module将js包添加为标准模块
- devDependencies,编译生成js包所需的开发依赖包,这里面引用的包,使用者使用安装该js时,不会下载这些依赖。
- dependencies,js包运行所需的依赖包,这里面引用的包,使用者使用安装该js时,会自动下载这些依赖。
# 创建webpack.config.js修改配置
# 基本配置
现在,让我们以某种方式打包这个 library,能够实现以下几个目标:
- 使用 externals 选项,避免将 lodash 打包到应用程序,而使用者会去加载它。
- 将 library 的名称设置为 num-word-chinese。
- 将 library 暴露为一个名为 numWordChinese 的变量。
- 能够访问其他 Node.js 中的 library。
此外,consumer(使用者) 应该能够通过以下方式访问 library:
- ES2015 模块。例如 import numWordChinese from 'num-word-chinese'。
- CommonJS 模块。例如 require('num-word-chinese').
- 全局变量,在通过 script 标签引入时
var path = require('path');

module.exports = {
  entry: './src/index.js',
  output: {
    path: path.resolve(__dirname, 'dist'),
    filename: 'num-word-chinese.js'
  }
};
2
3
4
5
6
7
8
9
# 外部化lodash
现在,如果执行 webpack,你会发现创建了一个体积相当大的文件。如果你查看这个文件,会看到 lodash 也被打包到代码中。在这种场景中,我们更倾向于把 lodash 当作 peerDependency。也就是说,consumer(使用者) 应该已经安装过 lodash 。因此,你就可以放弃控制此外部 library ,而是将控制权让给使用 library 的 consumer。
这可以使用 externals 配置来完成:
  var path = require('path');

  module.exports = {
    entry: './src/index.js',
    output: {
      path: path.resolve(__dirname, 'dist'),
      filename: 'num-word-chinese.js'
   }
   },
   externals: {
     lodash: {
       commonjs: 'lodash',
       commonjs2: 'lodash',
       amd: 'lodash',
       root: '_'
     }
   }
  };
2
3
4
5
6
7
8
9
10
11
12
13
14
15
16
17
18
# 暴露 library
对于用法广泛的 library,我们希望它能够兼容不同的环境,例如 CommonJS,AMD,Node.js 或者作为一个全局变量。为了让你的 library 能够在各种使用环境中可用,需要在 output 中添加 library 属性: library: 'numWordChinese' 将你的 library bundle 暴露为名为 numWordChinese 的全局变量,consumer 通过此名称来 import。为了让 library 和其他环境兼容,则需要在配置中添加 libraryTarget 属性。这个选项可以控制以不同形式暴露 library。最重要的模块输出选项应该是 libraryTarget ,它是用来决定模块以何种规范输出,在全局变量的 Name 是啥。其基本格式为:
output.libraryTarget[String]: var | assign | this | window | global | commonjs | commonjs2 | amd | umd 上面那些全部是都是可选项值。这里先告诉大家,在现代 JS 的写法中,最后一个 umd 的选项是最常用的。 libraryTarget: 'umd'
	var path = require('path');
	module.exports = {
	    entry: './src/index.js',
	    output: {
	        path: path.resolve(__dirname, 'dist'),
	        filename: 'num-word-chinese.js',
	        library: 'numWordChinese',
	        libraryTarget: 'umd'
	    },
	    externals: {
	        lodash: {
	            commonjs: 'lodash',
	            commonjs2: 'lodash',
	            amd: 'lodash',
	            root: '_'
	        }
	    }
	};
2
3
4
5
6
7
8
9
10
11
12
13
14
15
16
17
18
# 添加npm包的应用功能
src/index.js
import _ from 'lodash';
import numRef from './ref.json';

export function numToWord(num) {
  return _.reduce(numRef, (accum, ref) => {
    return ref.num === num ? ref.word : accum;
  }, '');
}

export function numToChinese(num) {
  return _.reduce(numRef, (accum, ref) => {
    return ref.num === num ? ref.chinese : accum;
  }, '');
}

export function wordToNum(word) {
  return _.reduce(numRef, (accum, ref) => {
    return ref.word === word && word.toLowerCase() ? ref.num : accum;
  }, -1);
}

export function chineseCurrency(number){
  var chineseNumber = "";
  var num = ["零", "壹", "贰", "叁", "肆", "伍", "陆", "柒", "捌", "玖" ];
  var unit = ["分", "角", "圆", "拾", "佰", "仟", "万", "拾", "佰", "仟", "亿", "拾", "佰", "仟", "万" ];
  var tempNumber = Math.round(number * 100) + "";
  var tempNumberLength = tempNumber.length;
  if("0" === tempNumber){
    return "零元整";
  }
  if(tempNumberLength > 15){
    return "超出转化范围";
  }
  var preReadZero = true;
  for(var i = tempNumberLength; i > 0; i--){
    if ((tempNumberLength - i + 2) % 4 == 0) {
      if (i - 4 >= 0 && "0000" === tempNumber.substring(i - 4, i)) {
        if (!preReadZero) {
          chineseNumber = "零" + chineseNumber  ;
          preReadZero = true;
        }
        i -= 3;
        continue;
      }
      preReadZero = true;
    }
    var digit = parseInt(tempNumber.substring(i - 1, i), 10);
    if (digit == 0) {
      if (!preReadZero) {
        chineseNumber = "零" + chineseNumber  ;
        preReadZero = true;
      }
      if ((tempNumberLength - i + 2) % 4 == 0) {
        chineseNumber = unit[tempNumberLength - i] + chineseNumber  ;
      }
    }
    else {
      chineseNumber = num[digit] + unit[tempNumberLength - i] + chineseNumber;
      preReadZero = false;
    }
  }
  if (tempNumberLength - 2 >= 0 && "00" === tempNumber.substring(tempNumberLength - 2, tempNumberLength)){
    chineseNumber += "整";
  }
  return chineseNumber;
}
2
3
4
5
6
7
8
9
10
11
12
13
14
15
16
17
18
19
20
21
22
23
24
25
26
27
28
29
30
31
32
33
34
35
36
37
38
39
40
41
42
43
44
45
46
47
48
49
50
51
52
53
54
55
56
57
58
59
60
61
62
63
64
65
66
67
- numToWord数字转英文
- numToChinese数字转中文
- chineseCurrency数字转金融货币写法
# 使用npm publish发布包
安装好webpack和webpack-cli 执行webpack命令将src/index.js打包到dist/num-word-chinese.js 登录npm,第一次登录npm adduser; 以后登录npm login 登录成功之后,执行npm publish发布程序包
# 测试包的使用
发布成功后,可以npm install --save-dev num-word-chinese安装包 初始化一套支持Es6的webpack环境进行测试
import * as numWordChinese from 'num-word-chinese';

console.log(numWordChinese.numToWord(8));
console.log(numWordChinese.numToChinese(3));
console.log(numWordChinese.chineseCurrency(88845));
2
3
4
5
6