 vue组件及生命周期(三)
- 第一篇:vue基础介绍,数据绑定(computed+watch) (opens new window)
- 第二篇:vue样式class和style (opens new window)
- 第三篇:vue组件及生命周期 (opens new window)
- 第四篇:vue父子组件之间的数据传递 (opens new window)
- 第五篇:vue动画与过渡 (opens new window)
- 第六篇:vue-router路由的使用 (opens new window)
- 第七篇:vuex数据管理 (opens new window)
# Vue组件介绍
vue的一大优势就是可以构建可以复用的组件。可以把一个大型的应用拆分成小型、独立且可复用的组件,在项目开发上有很大优势。 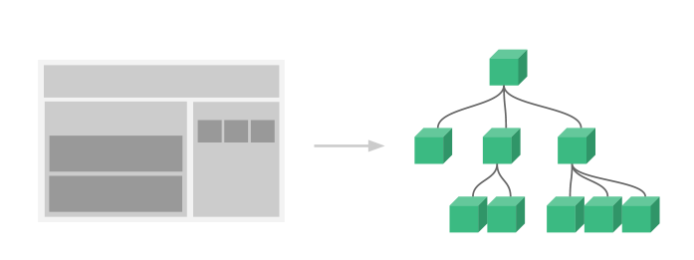
# 注册组件
// 定义名为 button-counter 的新组件
Vue.component('button-counter', {
  data: function () {
    return {
      count: 0
    }
  },
  template: '<button v-on:click="count++">You clicked me {{ count }} times.</button>'
})
2
3
4
5
6
7
8
9
如果需要给组件传递数据,可以给组件定义一个props属性。 组件是可复用的 Vue 实例,组件与 new Vue 接收相同的选项,例如 data、computed、watch、methods 以及生命周期钩子等
# 调用组件
<ol>
  <!-- 创建一个 button-counter 组件的实例 -->
  <button-counter></button-counter>
</ol>
2
3
4
# 组件的复用
<div id="components-demo">
  <button-counter></button-counter>
  <button-counter></button-counter>
  <button-counter></button-counter>
</div>
2
3
4
5
当点击按钮时,每个组件都会各自独立维护它的 count。因为你每用一次组件,就会有一个它的新实例被创建。 组件中的data必须是一个函数返回值 一个组件的 data 选项必须是一个函数,因此每个实例可以维护一份被返回对象的独立的拷贝:
data() {
  return {
    count: 0
  }
}
2
3
4
5
# slot插槽
和 HTML 元素一样,我们经常需要向一个组件传递内容 我们可以在定义组件的时候设置slot标签,用于显示自定义组件中的内容
Vue.component('alert-box', {
  template: `
    <div class="demo-alert-box">
      <strong>Error!</strong>
      <slot></slot>
    </div>
  `
})
2
3
4
5
6
7
8
插槽内可以包含任何模板代码,包括 HTML:
<alert-box>
  <span class="fa fa-user">!!!</span>
  some error message!
</alert-box>
2
3
4
# 后备内容
可以为插槽设置一个备用的默认值
<button type="submit">
  <slot>Submit</slot>
</button>
2
3
直接使用< submit-button >并且不提供任何插槽内容时:
<submit-button></submit-button>
被渲染的结果
<button type="submit">
  Submit
</button>
2
3
如果给插槽提供内容,则覆盖默认值
<submit-button>
  Save
</submit-button>
2
3
渲染结果
<button type="submit">
  Save
</button>
2
3
# 具名插槽
有时候需要多个插槽共同使用,slot有一个特殊的属性name,这个特性可以定义额外的插槽,不带name的slot带有默认属性default。
<div class="container">
  <header>
    <slot name="header"></slot>
  </header>
  <main>
    <slot></slot>
  </main>
  <footer>
    <slot name="footer"></slot>
  </footer>
</div>
2
3
4
5
6
7
8
9
10
11
在向具名插槽提供内容的时候,可以在template元素上用v-slot指令。
<base-layout>
  <template v-slot:header>
    <h1>Here might be a page title</h1>
  </template>

  <p>A paragraph for the main content.</p>
  <p>And another one.</p>
	<!--v-slot可以缩写#-->
  <template  #footer>
    <p>Here's some contact info</p>
  </template>
</base-layout>
2
3
4
5
6
7
8
9
10
11
12
# 作用域插槽
有时让插槽内容能够访问子组件中才有的数据是很有用的。例如,设想一个带有如下模板的 < current-user > 组件:
Vue.component('current-user', {
  template: `
    <span>
      <slot>{{ user.lastName }}</slot>
    </span>
  `
})
2
3
4
5
6
7
如果想让后备内容显示用户的名,以取代正常情况下用户的姓
<current-user>
  {{ user.firstName }}
</current-user>
2
3
这样代码不会正常工作,因为user对象是在组件中定义的数据,在组件中渲染完成。只有< current-user >组件可以访问到user
为了让 user 在父级的插槽内容中可用,我们可以将 user 作为 < slot > 元素的一个特性绑定上去:
Vue.component('current-user', {
  template: `
    <span>
      <slot v-bind:user="user">{{ user.lastName }}</slot>
    </span>
  `
})
2
3
4
5
6
7
绑定在 < slot > 元素上的特性被称为插槽 prop。可以在父级使用
<current-user>
  <template v-slot:default="slotProps">
    {{ slotProps.user.firstName }}
  </template>
</current-user>
2
3
4
5
# Vue的生命周期
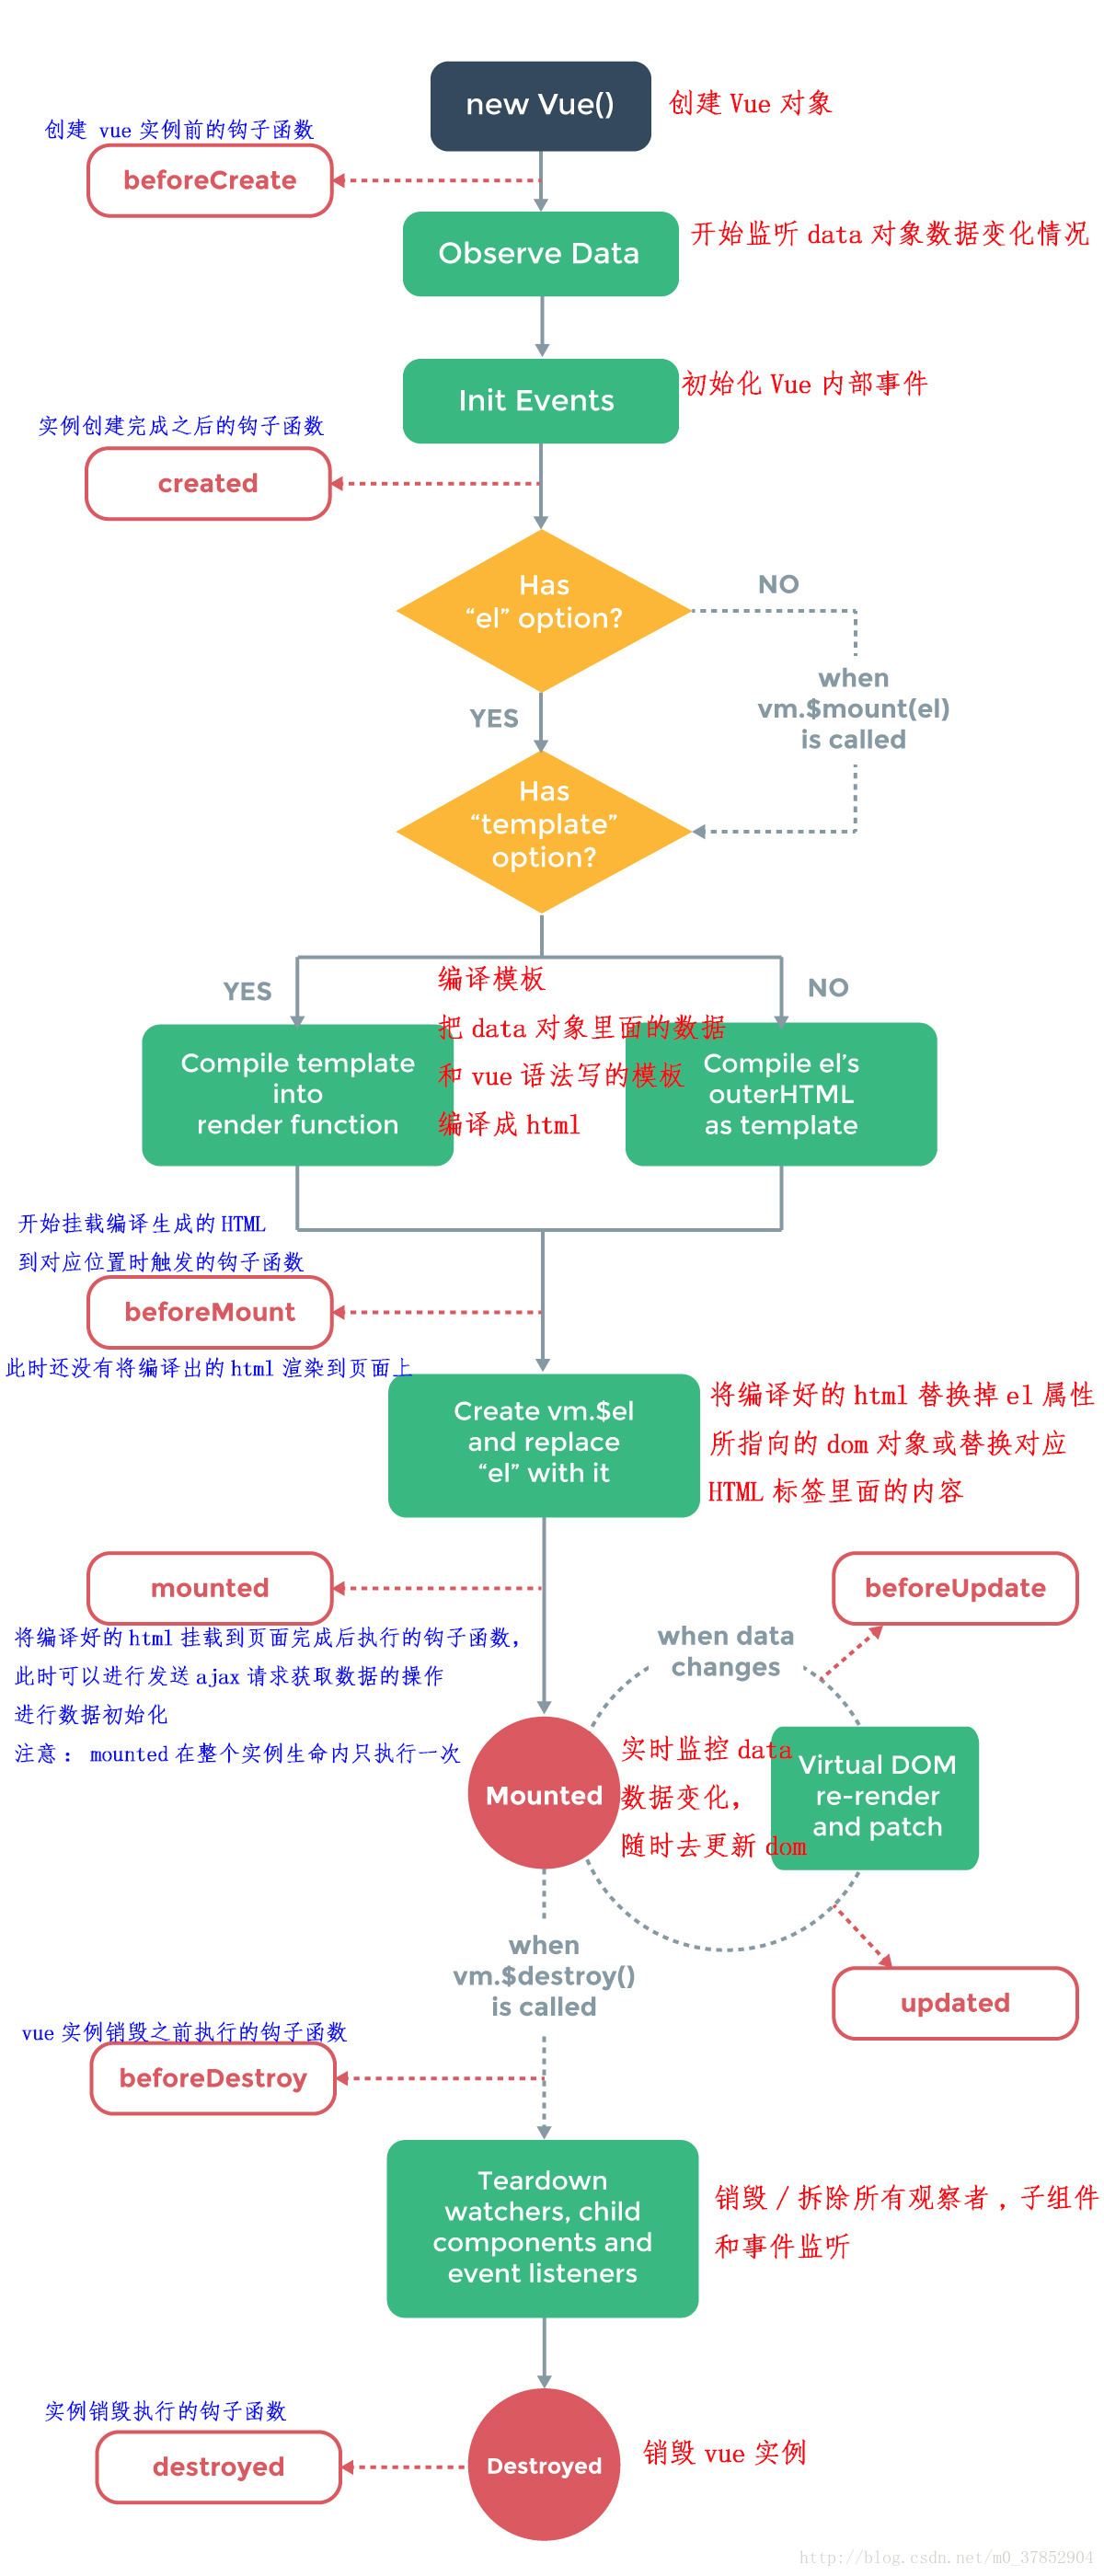
Vue实例有一个完整的生命周期,也就是从开始创建、初始化数据、编译模板、挂载Dom、渲染→更新→渲染、卸载等一系列过程,我们称这是Vue的生命周期。通俗说就是Vue实例从创建到销毁的过程,就是生命周期。 在Vue的整个生命周期中,它提供了一系列的事件,可以让我们在事件触发时注册js方法,可以让我们用自己注册的js方法控制整个大局,在这些事件响应方法中的this直接指向的是vue的实例。
# 生命周期全阶段
关于 vue 的生命周期,先来一份大纲:
- beforeCreate:vue实例的挂载元素
$el和数据对象data都是undefined, 还未初始化 - created:完成了
data数据初始化,el还未初始化。用于初始化数据 - beforeMount:vue实例的
$el和data都初始化了, 相关的render函数首次被调用。实例已完成以下的配置:编译模板,把data里面的数据和模板生成html。注意此时还没有挂载html到页面上。 - mounted:在
el被新创建的vm.$el替换,并挂载到实例上去之后调用。实例已完成以下的配置:用上面编译好的html内容替换el属性指向的DOM对象。完成模板中的html渲染到html页面中。用于对数据做逻辑处理 - beforeUpdate:在数据更新之前调用,发生在虚拟DOM重新渲染和打补丁之前。可以在该钩子中进一步地更改状态,不会触发附加的重渲染过程。
- updated:在由于数据更改导致的虚拟DOM重新渲染和打补丁之后调用。调用时,组件DOM已经更新,所以可以执行依赖于DOM的操作。然而在大多数情况下,应该避免在此期间更改状态,因为这可能会导致更新无限循环。该钩子在服务器端渲染期间不被调用。
- beforeDestroy:在实例销毁之前调用。实例仍然完全可用。
- destroyed:在实例销毁之后调用。调用后,所有的事件监听器会被移除,所有的子实例也会被销毁。该钩子在服务器端渲染期间不被调用。组件使用了setInterval定时器时,此时要做清除
- activated:使用keep-alive时,当组件激活的时候调用该钩子在服务器端渲染期间不被调用。
- deactivated:使用keep-alive时,当组件停用的时候调用该钩子在服务器端渲染期间不被调用。
- errorCaptured:这个生命钩子可以看官网,2.5.0之后才有的。当捕获一个来自子孙组件的错误时被调用。
创建create和挂载mount阶段的区别
| 生命周期 | 是否获取dom节点 | 是否可以获取data | 是否获取methods |
|---|---|---|---|
| beforeCreate | 否 | 否 | 否 |
| created | 否 | 是 | 是 |
| beforeMount | 否 | 是 | 是 |
| mounted | 是 | 是 | 是 |
# 在哪个生命周期内调用异步请求?
可以在钩子函数 created、beforeMount、mounted 中进行调用,因为在这三个钩子函数中,data 已经创建,可以将服务端端返回的数据进行赋值。 在 created 钩子函数中调用异步请求有以下优点:
- 能更快获取到服务端数据,减少页面 loading 时间;
- ssr 不支持 beforeMount 、mounted 钩子函数,所以放在 created 中有助于一致性;
也存在一些缺点
- created阶段还是虚拟dom,不能将数据添加到dom上,调用dom会出错
- created阶段的数据不能和页面业务(没有真实dom)做逻辑处理
下图是vue实例生命周期的整个过程:
<template>
    <div>
        <p>{{msg}}</p>
    </div>
</template>

<script>
export default {
    data(){
        return{
            msg:'vue'
        }
    },
    beforeCreate() {
        //组件刚刚被创建,组件属性计算之前时调用
        console.log('-- beforeCreate --');       // 输出 -- beforeCreate --
        console.log(`this.msg = ${this.msg}`);   // 输出 undefined
        console.log(`this.$el = `);              // 输出 this.$el =
        console.log(this.$el)                    // 输出 undefined
    },
    created() {
        //组件刚刚创建完成,属性已经绑定,但是还未生成dom节点,所以$el不存在,msg已经被绑定
        this.log('created')
        // 输出 -- created --
        // 输出 this.msg = vue
        // 输出 this.$el =
        // 输出 undefined
    },
    beforeMount() {
        //模板-编译-挂载之前,Compile,此时->
        this.log('beforeMount')
        // 输出 -- beforeMount --
        // 输出 this.msg = vue
        // 输出 this.$el =
        // 输出 undefined
    },
    mounted() {
        //模板挂载之后,此时$el已经有dom节点值
        this.log('mounted')
        // 输出 -- mounted --
        // 输出 this.msg = vue
        // 输出 this.$el =
        // 输出 dom节点
        this.msg = 'hello'
        // 组件更新之前会调用beforeUpdate
        // 输出 -- beforeUpdate --
        // 输出 this.msg = vue
        // 输出 this.$el =
        // 输出 dom节点
        // -->
        // 组件更新之前会调用updated
        // 输出 -- updated --
        // 输出 this.msg = hello
        // 输出 this.$el =
        // 输出 dom节点
    },
    beforeUpdate() {
        this.log('beforeUpdate')
    },
    updated() {
        this.log('updated')
    },
    beforeDestory() {
        //组件销毁前调用
        this.log('beforeDestory')
    },
    destoryed() {
        //组件销毁后调用
        this.log('destoryed')
    },
    activated() {
        // 组件使用keep-alive,被激活时调用
        this.log('activated');
        // 输出 -- activated --
        // 输出 this.msg = hello
        // 输出 this.$el =
        // 输出 dom节点
    },
    deactivated() {
        //组件使用keep-alive,组件被移除时候调用
        this.log('deactivated');
        // 输出 -- deactivated --
        // 输出 this.msg = hello
        // 输出 this.$el =
        // 输出 dom节点
    },
    methods:{
        log(str){
            console.log(`-- ${str} --`)
            console.log(`this.msg = ${this.msg}`);
            console.log(`this.$el = `);
            console.log(this.$el)
        }
    }
}
</script>
2
3
4
5
6
7
8
9
10
11
12
13
14
15
16
17
18
19
20
21
22
23
24
25
26
27
28
29
30
31
32
33
34
35
36
37
38
39
40
41
42
43
44
45
46
47
48
49
50
51
52
53
54
55
56
57
58
59
60
61
62
63
64
65
66
67
68
69
70
71
72
73
74
75
76
77
78
79
80
81
82
83
84
85
86
87
88
89
90
91
92
93
94
95
96
97
# 缓存路由组件的生命周期
<keep-alive>
    <router-view></router-view>
</keep-alive>
2
3
在被keep-alive包含的组件/路由中,会多出两个生命周期的钩子:activated 与 deactivated。
# 缓存组件被激活activated
activated在组件第一次渲染时会被调用,之后在每次缓存组件被激活时调用。 activated在mounted之后调用,在beforeRouteEnter守卫传给next回调函数之前调用。
beforeMount=> 如果你是从别的路由/组件进来(组件销毁destroyed/或离开缓存deactivated)=> mounted=> activated 进入缓存组件 => 执行 beforeRouteEnter回调
因为组件被缓存了,再次进入缓存路由/组件时,不会触发正常流程的生命周期 有:beforeCreate、 created、 beforeMount、 mounted 都不会触发。 被缓存后的组件再次(非第一次)被激活时调用的生命周期:
组件销毁destroyed/或离开缓存deactivated => activated 进入当前缓存组件 => 执行 beforeRouteEnter回调
# 缓存组件被销毁deactivated
使用了keep-alive就不会调用beforeDestroy(组件销毁前钩子)和destroyed(组件销毁),因为组件没被销毁,而是被缓存起来。
这个钩子可以看作beforeDestroy的替代,如果你缓存了组件,要在组件销毁的的时候做一些事情,你可以放在这个钩子里。
离开缓存组件的生命周期流程:
组件内的离开当前路由钩子beforeRouteLeave =>  路由前置守卫 beforeEach =>  全局后置钩子afterEach => deactivated 离开缓存组件 => activated 进入缓存组件(如果你进入的也是缓存路由)
 // 如果离开的组件没有缓存的话 beforeDestroy会替换deactivated
 // 如果进入的路由也没有缓存的话  全局后置钩子afterEach=>销毁 destroyed=> beforeCreate等
2
3
# 生命周期activated返回上一页不重新请求数据,其他情况刷新数据
对于缓存起来的组件,非第一次进入并且从子页面返回的时候,不重新请求数据接口,不刷新数据。 第一个进入页面或者从其他页面跳转进来的,都请求数据接口进行初始化。 首先在路由中设置router.meta的两个重要属性keepAlive和isBack
// keepAlive和isback这两个很重要!
{
      path: '/userlist',
      name: 'userlist',
      meta: {
        keepAlive: true, //该字段表示该页面需要缓存
        isBack: false, //用于判断上一个页面是哪个
      },
      component: resolve => require(['@/views/userlist/userlist'], resolve) // 路由懒加载
    }
2
3
4
5
6
7
8
9
10
11
然后设置接口是否刷新的逻辑判断,主要是判断1.是不是第一次进入页面,而不是缓存的页面。2.是不是从子页面返回的。
<script>
  export default {
    data() {
      return {
        isFirstEnter: false, //不是第一次进入
      }
    },
    beforeRouteEnter(to, from, next) {
      if (from.name == 'nextName') { // 这个name是下一级页面的路由name
        to.meta.isBack = true; // 设置为true说明你是返回到这个页面,而不是通过跳转从其他页面进入到这个页面
      }
      next()
    },
    activated() {
      if (!this.$route.meta.isBack || this.isFirstEnter) {
        this.initData() // 这里许要初始化dada()中的数据
        this.getDataFn() // 这里发起数据请求,(之前是放在created或者mounted中,现在只需要放在这里就好了,不需要再在created或者mounted中请求!!)
      }
      this.$route.meta.isBack = false //请求完后进行初始化
      this.isFirstEnter = false;//请求完后进行初始化
    },
  }
</script>
2
3
4
5
6
7
8
9
10
11
12
13
14
15
16
17
18
19
20
21
22
23